
Be Still
Be Still is a third-person Survival Horror game where the player takes control of a small wind-up toy trapped inside a child's bedroom. The player's objective is to escape the burning gaze of an entity whose sole aim is to rid this place of beings like you. Unlike traditional survival horror games, the player's life is directly tied to the wind-up key attached to their back. Every action consumes energy, forcing the player to carefully manage movement, interactions and risk-taking throughout the level.
This project was our final game for our Bachelor's program, we had 3 weeks to create this with a team of 8 students.
Gameplay Programming
Wind-Up System
The Wind-Up System serves as both the player's health system and the game's primary resource management mechanic. Since the player character is a mechanical toy powered by a wind-up key, we wanted every action performed by the player to consume energy. This allowed the key to become more than a visual element and tie it to the survival aspect. The system constantly drains energy over time, encouraging players to keep moving while carefully managing their remaining resources.
Core Gameplay Loop

The objective was to create a resource system that naturally reinforced the player's identity as a wind-up toy. The Wind-Up System continuously evaluates the player's current state and adjusts energy consumption accordingly. Different actions consume energy at different rates. Rather than using a traditional health bar, we wanted the player's survival to be represented through something physically attached to the character. This approach helped connect gameplay mechanics, visual storytelling and player feedback into a single system.
First Prototype
The first version of the system focused entirely on functionality. Rewinding the key was implemented through a button-mashing mechanic. Each successful input restored a portion of the player's energy, allowing the health value to gradually increase. From a technical perspective, the system worked as intended and successfully communicated the idea of manually winding up a mechanical toy. This version functioned correctly but when we tried to introduce the animations, because the mechanic relied on rapid repeated player input. With the current state of the code it was hard to successfully integrate the animations wihtout there being a disconnect between the player's input and the visual aspect. The updated version made it a lot easier to implement the animations and sound design later on.
Play-Dead System
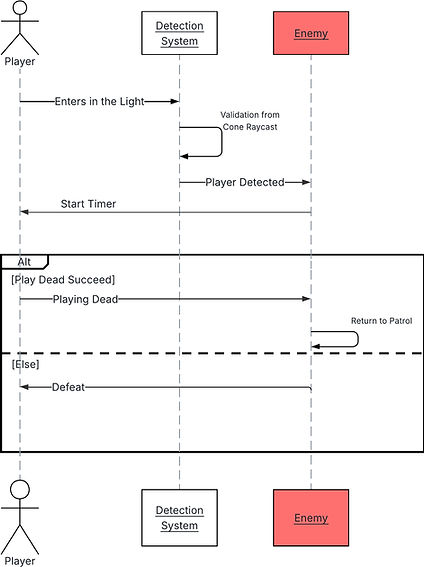
The Play Dead mechanic was created as the player's primary defensive tool against the game's antagonist. When detected by the enemy's spotlight, the player is given a short window of time to react. Instead of immediately losing the game, they can pretend to be an inanimate toy and convince the enemy that they are harmless. This mechanic changes the dynamic where being detected isn't an instant fail but rather a moment of tension where the player must react quickly under pressure.
Core Gameplay Loop
The goal was to create a system that encouraged player decision-making rather than punishing mistakes immediately. Since the player controls a toy, pretending to be lifeless felt like a natural extension of the game's theme and world. From a gameplay perspective, it also provided a second chance mechanic that helped reduce frustration while maintaining tension.
Final Implementation
The system simply checks whether the player has activated the Play Dead state before the detection timer expires. If the player reacts in time, the enemy stops considering them a valid target and resumes its normal patrol behavior. One of the biggest challenges was integrating the mechanic with the enemy's detection system. The AI needed to distinguish between: - A normal player. - A detected player. - A player currently playing dead. This meant that every iteration of the detection system also required adjustments to the Play Dead mechanic. Whenever the detection logic changed, the enemy's response to the Play Dead state had to be updated as well. Because of this dependency, both systems evolved together throughout development.
AI Programming
Player Detection System
One of the core mechanics of the project relies on the enemy's ability to detect the player when they are within the beam of light projected from her eyes. Along with this system I also created a tool for the enemy's movement that my Game Designers could program the movement as they please. The challenge while creating this feature was that the Enemy should only detect the player when they're standing inside of the visible light beam. In order to achieve this I had to think of a few systems before achieving the final version currently present in the game.


First Version
The initial version I adapted was to measure the amount of light received by the player using a Scene Capture Component to capture a cube sitting on top of the player's head. Player → Scene Capture → Pixel Values → Light Value → Detection The reason we moved away from this solution was that ambient light affected the calcultations so it made the detection inconsistent. Which would lead to unwanted behaviors from the Enemy, which is not ideal for a game where the main focus is AI Behavior and predictability.


The Solution
Instead of measuring how much light the player was receiving, I moved on to a different structure that measured if the player was inside of the spotlight volume. This can be quite tricky because a spotlight isn't always the same size, it has a cone shape which isn't easy to achieve using a simple raycast. This is why I opted for this new setup, where I decided to fully reconstruct the spotlight’s physical volume mathematically inside the script, using the light component's native parameters: Attenuation Radius and Outer Cone Angle.

Step 1: Calculate Balayage Radius
Formula : Radius = Cone Height * TANd(Cone Half Angle) To ensure the initial Multi Sphere Trace For Objects is large enough to cover the spotlight, we need to find the width of the cone at its furthest point. Using the tangent function, the system calculates this radius by combining the spotlight’s range (Cone Height) and its beam width (Cone Half Angle).


Step 2: Angle Filtering
Formula : Delta Angle = ACOSd(Spotlight Forward Vector * Hit Direction Vector) Because the initial sphere trace captures everything in a giant bubble, we must discard objects sitting too far to the sides. By performing a Dot Product followed by an Arc Cosine (ACOSd), we find the exact angle of the player relative to the center of the beam. If this value is greater than the Cone Half Angle, the player is ignored.

Step 3: Flattening The Cap
Formula : Max Allowed Distance = Cone Height / COSd(Delta Angle) A standard sphere sweep leaves an unintended rounded dome edge at the end of its path. Since real spotlights hit surfaces flatly, we use the Cosine (COSd) function to calculate the maximum straight-line distance allowed at the player's specific angle. If the player's actual distance exceeds this Max Allowed Distance, they are outside the cone and safely skipped.

Step 4: Line of Sight Validation
We must handle environmental occlusion as well. The final stage executes a standard Line Trace By Channel set to the Visibility channel. It casts a single ray from the eye's Start Point directly to the target's Actor Location. If an obstacle blocks the ray, the hit returns true, the branch fails, and the player remains hidden. If the path is entirely clear, visibility is confirmed.
Eye Patrol System


One of my responsibilities was developing the enemy's eye scanning behavior. Since the entire detection system relies on the enemy's spotlight, I needed a way for our Game Designers to easily control where the enemy would look without modifying any code. To solve this, I created a Component that could be attached directly to the enemy. The component manages the eye movement logic, waypoint navigation, and rotation interpolation. The goal was to create a system that was flexible and easy to iterate on during production.
Design Goals
The system was built around three main objectives: - Allow designers to create patrol patterns without touching Blueprints. - Produce smooth eye movements. - Support different scanning behaviors in different areas of the level. Instead of hard-coding rotations, designers simply place waypoint actors in the level and assign them to different areas. Each waypoint can also define a custom waiting duration, this allows some positions to be observed longer than others.
Technical Breakdown
The eye movement is calculated entirely in real-time. For every waypoint, the system: 1. Retrieves the Eye Root world position. 2. Retrieves the current waypoint world position. 3. Calculates the rotation required to look directly at the waypoint. 4. Converts that rotation into a target rotation. 5. Smoothly interpolates toward it using RInterp To. This creates a natural scanning motion instead of instant snapping.
